The Sea of Sauce Saga Continues…
 I’ve been hard at work trying to put up 250 lbs of apples. Now, that sounds like a lot but
  it doesn’t look too bad. Ten plastic bags full of big juicy apples…what it sounds like is ‘delicious’. Well, let me tell you, it has kept me busy. I’ve got 4 different types of apples to make into sauce. Courtlands, Wealthys, Snows and Spartans. All uniquely different and I’ve done batches of each on their own and mixed together. The consistency is about the same but the flavours range from sweet to a bit more savory. I think my favorite so far is the Wealthys (which are a little tart) but the verdict is still out since I haven’t tried the Spartans. That’s tomorrows job.
Put up total on Saturday October 9th:
- Courtland apple sauce ~ 15 x 500mL regular mouth mason jars
- Spiced Courtland apple sauce ~ 6 x 500mL regular mouth mason jars
Put up total on Sunday October 10th:
- Courtland and Wealthy apple sauce 16 x 500mL regular mouth mason jars
Put up total today:
- 1 x 1L regular mouth mason jar for the fridge
- 19 x 500mL regular mouth mason jars
 Today, I also tried a recipe from Mrs. Wheelbarrow’s Kitchen for SPICED APPLES IN A JAR. I admit this was a challenging one. This recipe is easy to follow and she provides you with wonderful pictures that explain the steps but I had difficulty with the processing. When she says PACK the jars…she means it!! I had to process all four pints twice and one of them a third time. Each time topping them up with the 250mL I didn’t get in the jar the first time. And, after all of the canning I’ve done!?! Go figure!?! Finally, they’ve all sealed but I do way too much canning to be bothered reprocessing. The good thing is this will make excellent pastry filler and it is delicious!

Put up total:
- 4 x 500mL regular mouth mason jars.
Rose Hip Syrup
Rose hip syrup…MMMmmm…delicious. Picking the rose hips the other day was lots of fun and deciding what to do with them was easy once I came across this recipe out of River Cottage Handbook No. 2 Preserves by Pam Corbin. Rose hip syrup. Looks easy. And, sometimes the simplest recipes can surprise you by being the tastiest.

For more information on the benefits and uses of rose hips check out Wikipedia.
RECIPE FOR ROSE HIP SYRUP:
- 1 pound Rose hips
- 3 cups granulated sugar
- Wash rosehips in cold water, removing the stems and attached leaves.
- In a stainless steel saucepan bring 3 cups of water to the boil. Meanwhile, chop the rosehips in a food processor or cut up well using a sharp knife. Add them to the pan of boiling water, cover and bring back to the boil.
 Remove pan from the heat and allow to cool for about 10-15 minutes. Pour mixture into a moistened jelly bag and let the liquid drip for an hour.
- Set aside the strained juice. Repeat the above process by boiling an additional 3 cups of water, adding the rosehip pulp, bringing the mixture back to a boil and removing from heat. Strain the mixture for a second time in a moistened jelly bag and leave to drip overnight.
- The next day, discard rosehip pulp. Combine both lots of collected juice and measure (you should have about 1 litre). Pour the rosehip juice into a stainless steel saucepan, add the sugar and heat, stirring until dissolved. Bring to a boil for 2-5 minutes.

- Ladle hot rose hip syrup into hot sterilized jars, leaving 1/2″ headspace.

- Remove air bubbles and adjust headspace, if necessary, by adding more liquid. Wipe rim using a damp paper towel. Center lid on jar. Screw band down until resistance is met, then increase to fingertip-tight.
- Place jars in canner, ensuring they are completely covered with water. Bring to a rolling boil and process for 20 minutes. Remove canner lid.


Wait 5 minutes, then remove jars, cool, label and store.
Put up Total:
- 5 x 250mL regular mason jars
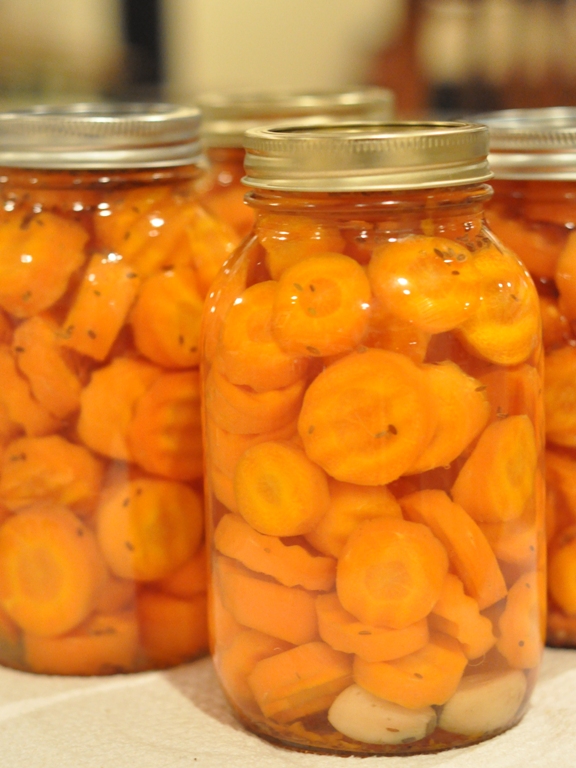
Dilled Carrot Chips
Our photo shoot with Scott Turnbull of Turnbull Photography continues for its’ third and final day. He is interested in capturing as many of the different steps involved in canning as well as a few different things we jar so the readers can share in the whole experience. Turnbull has spent countless hours photographing our harvesting, foraging, preparing, cooking and jarring. I’m really excited to see how it all comes together. It is my hope that this article inspires more people to try their hand at canning. It’s not too hard…after all anyone who knows me will tell you “if I can CAN anyone can CAN!” I don’t know how to cook a meal from start to finish but for some reason canning is different…much easier.
The carrots that we harvested at The Godson homestead were too big to fit into jars whole. So, I decided to make them into fancy little dilled carrot chips. Same great taste in fancy little bite size pieces. I used the same recipe mentioned in an earlier post but cut these huge carrots with a fancy little tool or you could just cut them with a knife.

One of the important steps in home preserving is measuring the  headspace. For this recipe the required headspace is 1/2″. Using this handy little tool that you can purchase from Bernardin takes all of the guess work out of this part of the recipe. I recommend purchasing the Bernardin Home Canning Kit that comes with jarring tongs for easily lifting boiling jars in and out of the waterbath, a magnet wand for putting on the sterilized lids, and a headspace measurer. You can order these kits on line from Bernardin or pick them up at your local Canadian Tire, Home Hardware or any store that sells the canning jars. It’s a must have!
When we first started canning we followed the recipes to a tee but didn’t always understand why headspace was important or removing the air bubble was necessary. But, after canning countless jars and reading more and more books and recipes I’ve come to realize the importance of correctly measuring headspace and removing bubbles.
Headspace is defined as the unfilled space above the food in a jar and below its’ lid. Directions in home canning recipes often require us to leave 1/4″ (inch) headspace for jams, jellies, and marmalades and 1/2″ (inch) for fruits and tomatoes being processed in a boiling water bath. For low acid food recipes where a pressure canner is used to process the jars, the headspace required main range from 1″ (inch) to 1 1/4″ (inches).
Headspace is needed for expansion of food as jars are processed in boiling water and for forming vacuum seals as the jars cool. The extent of expansion is determined by the air content in the food and by the processing temperature. Air expands greatly when heated to high temperatures; the higher the temperature, the greater the expansion. Foods expand less than air when heated. This is why you must leave more headspace when using a pressure canner!


- 4 x 1L ~ 3 Regular mason jars and 1 wide mouth
Foraging in Muskoka
Despite the fact that Matt and I have way too much on our plates right now and our time to enjoy the days is limited to completing the most basic tasks it is hard not to take a minute to be thankful for such a beautiful fall day.

This morning Matt and I went over to The Godson homestead to continue our photo shoot with Scott Turnbull. He wanted some pictures of us harvesting in the garden. Scott’s wife, Miranda, has a green thumb and going to their garden is a huge treat for me. I practically start to drool when I see the abundance of food that they grow and with great success. Last year, Scott and Miranda kindly gave us a whole big box of carrots that we happily accepted and then proceed to jar into dilled carrots. Now, a must have staple in our house…which is odd, considering the fact that carrots were never a favorite of mine. But, I can not resist a jar of dilled carrots. Truly a treat!
Hard at work, Turnbull, busily took photos of Matt and I pulling the largest carrots I’ve ever seen from the cool dirt. The size of these carrots was completely shocking and I couldn’t help wondering how they were going to fit into a 500mL jar…the answer was, they weren’t. They were HUGE! We pulled about 30-40 carrots out with plans of making them into dilled carrot something.
Then we moved our photo shoot to the back roads of Muskoka where we could do a little bit of foraging. Foraging has become one of our greatest joys. It is so fun to come across that special bush full of eatable berries and know that you will be able to create something truly unique from its’ bounty. Earlier, I’d seen a wild rose-bush growing in a swampy ditch and decided that it would be interesting to pick the hips and try making them into something. Turnbull felt it would be great to capture some of our collecting on film as this year we canned a number of different foods that grow wild in our area. You’d be surprise to know how much is out there when you really start to look.
Unfortunately, I don’t have any pictures of our adventures climbing in the ditches. In fact, Scott ended up getting down there with Matt to help collect the hips while I watched. What a trooper!
Here is a picture of just some of the wild things we foraged and canned this summer…excluding our recently found wild rose hips.

Top 10 Reasons to CAN and PRESERVE
I am getting ready to host my first canning party and although most of my friends are really into gardening and canning there are a few that could use a little persuasion. In order to attend my party you must CAN or preserve at least one food item for this year. My goal is to get more people excited about canning and preserving their own food. This party is for beginners as well as the more experienced canner. It is time to EAT UP what we’ve PUT UP!
Top 10 Reasons to CAN:
- Know what you are eating. When you CAN your own food you are in control of what goes into each jar. And, although you may need to source the produce from your local farmers’ market, veggie shop, garden co-op, a friend or the grocery store you are the one responsible for cleaning, preparing and jarring your food. It’s empowering!
- Eliminate the preservatives. Too many of us eat too much fast food, over prepared food, frozen junk and food that is more filler than anything. I’m not saying I don’t like a good cheeseburger but we’ve got to find a healthy balance. Do away with additional preservatives so that you can enjoy that burger as a treat…guilt-free.
- Better than TV. I’m an artist by profession and used to spend my evenings painting my wood carvings in front of the TV. I calculated that in an average day I had the TV on for about 5-6 hours. Now, that does seems excessive and maybe impossible to believe but it’s true. This left very little time to enjoy the evening communicating with my husband. Now, Matt and I spend most of our free time growing veggies in our garden, forging the back roads, and canning everything we can get our hands on. Time well spent.
- Cut down on your CARBON FOOT PRINT. Growing your own food to can or canning locally produced fruits and veggies cuts down on the fuel emissions spent moving fresh produce around. Has anyone seen that new show 100 miles? It’s an experiment with several British Columbia families taking part in a challenge to only eat food that is grown within 100 miles of their home. Although, this would be impossible for most of us because of our endless need for sugar and vinegar the concept is great. Why not incorporate as much of this idea as we can and try to be more conscious of where our food is coming from and try sourcing more local produce.
- Eating GREAT food is GOOD. When you are at the helm you can create the food that you enjoy most. Take the time to season it perfectly or experiment with a new recipe. Lots of times you will be pleasantly surprised with how good it turns out. This year I’ve tried lots of new foods and recipes with both successes and failures but it is finding that one great recipe and those favorite ingredients that can turn something in a jar into something you can’t live without. Like the Tomato Jam…mmmmMMMdelicious!
- Reuseable Jars and Lids. Part of the reason I first started canning was to cut back on our household waste. Buying food in plastic and tin cans is not only harmful to your health but the by-products and waste just don’t make good sense. We’ve all got to do our part to cut back on adding to the landfills. Canning jars are reuseable help to eliminate a great amount of waste. And I just found out about these cool reuseable lids from Tattler. Now, that makes canning even better.
- Great gifts. There is nothing in the world like getting a great home-made gift. Something that a friend or family member took the time to make is better than anything money can buy. And, although not all of us can paint a master piece or sew an amazing quilt…all of us can read. So there is no excuse not to follow a recipe to create a unique jar of preserves to give to that special person in your life.
- Rewarding. There is nothing more satisfying that opening a jar of your own home-made preserves. The time spent putting up countless bushels of tomatoes and cucumbers, fresh fruits and veggies will satisfy you for many months to come. It’s like having a grocery store with stocked shelves right at your finger tips.
- Support Local Agriculture. These days nothing seems more important that supporting the hard-working men and women that grow the food we put in our mouths. Why not go to them directly? You get food that is freshly picked and bred for its’ flavour while preserving agricultural green space.
- Because it is just plain fun!
Apple Sauce
On Wednesday, I headed off to the Gravenhurst Farmers’ Market to pick up 3 bushels of apples. The drive there was breath-taking as all of leaves on deciduous trees are in brilliant shades of orange, yellow, and red. It makes me very thankful to live in a semi-remote part of the world where the landscape still seems relatively untouched. Thankful!
Allin’s Orchard and Country Market has a wonderful array of freshly picked apples and although their season doesn’t start until August they are by far the busiest booth at the market now. Their apples look and smell so delicious it was hard to walk away with just 3 bushels. Brian kindly helped me load a bushel of Courtlands, a bushel of Wealthys and a bushel of Honey Crisps into the truck. The Courtland and Wealthy apples were Brian’s recommendation for making sauce so that is what I’m going to try this year. And, over the course of the next few years I am going to try making sauce with as many of their 26 varieties as I can. Afterall, everything comes down to personal preference and individual taste but I don’t think you can go wrong when you are following the suggestion of someone who knows apples in the way the Allin’s do. The Honey Crisps, were my big splurge, as they are one of the most expensive apples on the market but they are the shiniest red and have a sweetest taste…it is out of this world. I am actually drooling as I think about it. Wait…I’ll be back…going to get one!

Mmmm…that’s better.
Now, back to making apple sauce. Tonight we had the privilege of having  photographer Scott Turnbull of Turnbull Photography over to shoot us “canning in the kitchen” for an upcoming issue of The Muskoka Magazine. How exciting!?! When he got all of his equipment set up in our kitchen, the dome lighting, amazing camera gear, flash equipment everywhere…I have to admit I felt a bit like a TV celebrity. Okay, get your head out of the clouds and focus on the sauce. Obviously, we choose to make apple sauce because that is the time of year it is…and apples are ready to be made into sauces, pickles, butters and anything else your little heart desires.
Making apple sauce is so easy and let’s not forget lots of fun! We started out with a clean kitchen and bowls of apples everywhere.
OUR RECIPE FOR APPLE SAUCE (yield approximately 8x500mL):
- 12 lbs apples (we are using Courtland and Wealth Apples but sky is the limit)
- 6 cups water
- 4 tbsp lemon juice
- Working in batches cut the apples into chucks about 2 inches big and place them in a 8 quart sauce pan with 1 to 1 1/2 cups water. Bring to a simmer on medium-high heat and cook until all of the apples are soft and mushy. Stirring often to makes sure they do not stick to the bottom. It takes about 15-20 minutes depending on the crispness of your apple.
- Put cooked apples through a food mill to remove all of the skin and seeds. Collecting the apple puree in a bowl.
- Repeat steps 1 and 2 until all of the apples have been pureed
- Put apple puree in a larger 20 quart stainless steel saucepan and add 4 tbsp of lemon juice.
- Bring to a boil and boil for 5 minutes. At this point, you can check the taste of your sauce to see if you would like to add sugar or spices, such as cinnamon or nutmeg. We decided to do plain apple sauce.
- Ladle hot apple sauce into sterilized jars, leaving 1/2″ headspace.
- Remove air bubbles and adjust headspace, if necessary, by adding hot apple sauce. Wipe rim. Center lid on jar. Screw band down until resistance is met, then increase to fingertip-tight.
- Place jars in canner, ensuring they are completely covered with water. Bring to a boil and process for 20 minutes. Remove canner lid. Wait 5 minutes, then remove jars, cool, label and store.

Please note: Apple sauce tends to siphon. We processed two batches one that siphoned and one that did not. The next day, remember to remove rings and clean jars or you may have a sticky mess on your hands when you go to open them up.
Put up Total:
- 8 x 500mL regular mouth mason jars
- 4 x 500mL wide mouth mason jars


