Harvesting the Veggies…A Day of Rest?
Today, I excitedly went over to my friends garden. She has one of the most beautiful and abundant growing gardens I’ve ever seen. Everything is planted and grown with love and you can tell.
It was a day off from canning and a chance to connect with where our food actually comes from and the work that goes into harvesting it. And, I am just talking about the harvesting here…let’s not forget about the planting, weeding, watering, picking throughout the season and the knowledge that is required to make it all work. It is a gift. I am still at the trial and error stage of growing food in my raised boxes so today was a wonderful opportunity to work in a producing garden with an expert.
We started with the pumpkins. Unfortunately, last night we got our first frost…no time to waste. Let’s get them out of there!


After we had picked and loaded the pumpkins we moved on to other tasks. There are herbs to remove and beds to be tilled and garlic to be planted. Lots to do. The soil at Suzann’s place is so wonderful, a rich dark brown with a earthy smell, just perfect for growing so many delicious things.
We picked peppers…hot peppers by the basket and green tomatoes by the box. I  am going to enjoy trying a recipe for pickled green tiny tomatoes. In fact, just the other day I received this really interesting recipe for turning green baby tomatoes into an olivey tasting delight. MmmmMMMdelicious!
And, for these hot little fellows to the right…well, I think they will go perfect in some of the salsas I’m making with the never ending supply of tomatillos. It is amazing what the right growing conditions will do for your plants. Sun…that is what we are missing here but Suzann has tons of sun. These peppers where just laddled on every plant. It’s hard to believe they could stand up straight with the weight of more than 30 peppers per plant pulling them down.
What’s next? Fall raspberries. These late producing raspberry bushes are the best. And, the little red berries where plump and juicy. A real treat.

There is something special about being out on such a sunny, cool fall day picking raspberries. It was a peaceful experience with the changing forest leaves as your backdrop, tolling in the soil, harvesting the fruits of your labour and enjoying the company of a good friend. It doesn’t get better than this.
Off to the bed of tomatillos…yes, they are a weed and a delicious one. They grow in a large tangled mass and produce an endless about of packaged green little guys. I enjoy them so much that every once in a while I’d chew down one that was a little too split to keep but not bad enough to pass up. So so tasty!

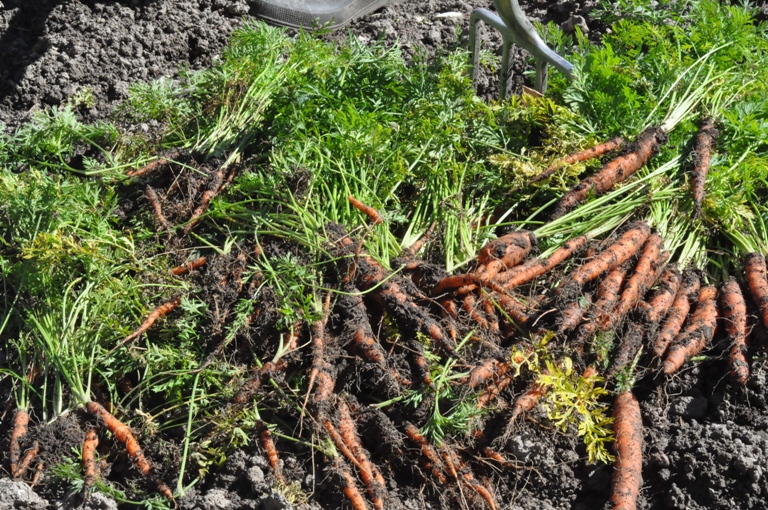
Last but certainly not least…CARROTS. As a child growing up I never really like carrots but last year after pickling them like cucumber dills I feel in love…true love. They are sweeter than dill pickles with a firm crunchy consistency that makes them a perfect pickled pleasure. I think we put up about 18 litres last year most of them regular flavour but a few had the added bite of hot peppers. They sure did become hot over time, too hot for me but perfect for Matt. I hope to put up as many as last year but only time will tell.

There sure were lots of carrots and alot of them the perfect size and length for those 500mL jars. If you have a good sunny spot and grow carrots well don’t thin them out and you will get smaller carrots perfect for canning. Or, at least that has been our experience.


I’ve left a few things out here and there but that basically covers my day spent with  Suzann tolling in the soil, harvesting her bountiful crop, preparing some of the beds for next year and enjoying the warmth of this amazing fall day. She still has lots to do and maybe I’ll get a chance to help again. So, the next time you go to the grocery store to pick up that bunch of carrots or that box of raspberries remember someone worked really hard to get them to you. I mean really hard. Today, I was fortunate to help with just a small part of the harvesting but Suzann works really hard for many many months to grow all this food while keeping her garden a beautiful show piece with many varieties of flowers as well. There is a wonderful sense of pride and accomplishment you feel when you grow what you eat. It’s not just magic but a lot of hard work. By the end of the day I was worn out and so were my boots.
I should also mention that Suzann kindly provided me with boxes of carrots for my dill pickling, green tomatoes for olive making, fennel bulbs for something (not sure yet), horseradish root for making horseradish, lots of fiery hot green peppers a perfect partner for the tomatillos and a few leeks. Back to canning…no rest for the weary or is it wicked?
 I just had to throw this picture in…the largest sunflower ever!?!
Drying Herbs
One of the foods we successfully grew in our garden this summer were herbs. And, the plants are lush and full but the weather outside is getting colder by the day and frost is on its’ way. Now is the time to cut those fresh herbs and bring them indoors to dry. I cut some parsley, oregano, lavender, and mint this morning around 10am.
DRYING HERBS FOR USE LATER:
Harvesting
- Harvest before flowering. Throughout the summer as you use your herbs be sure to pinch off the flowers. This will promote strong growth and prevent them from going to seed. As the weather cools your non-hardy herbs will start to decline, so late summer (for us September) is a good time to begin drying your herbs.
- Cut in mid-morning. Let the morning dew dry from the leaves, but pick before the plants are wilting in the afternoon sun.
How To Dry Herbs
 1. Cut healthy branches from your herb plants.
- 2. Remove any dry or diseased leaves.
- 3. Shake gently to remove any insects.
- 4. If necessary, rinse with cool water and pat dry with paper towels. Wet herbs will mold and rot.
- 5. Remove the lower leaves along the bottom inch or so of the branch.
- 6. Bundle 4 – 6 branches together and tie as a bunch. You can use string or a rubber band. The bundles will shrink as they dry and the rubber band will loosen, so check periodically that the bundle is not slipping. Make small bundles if you are trying to dry herbs with high water content.
- Punch or cut several holes in a paper bag. Label the bag with the name of the herb you are drying.
- Place the herb bundle upside down into the bag.
- Gather the ends of the bag around the bundle and tie closed. Make sure the herbs are not crowded inside the bag.
- Hang the bag upside down in a warm, airy room.
- Check in about two weeks to see how things are progressing. Keep checking weekly until your herbs are dry and ready to store.

Storing Dry Herbs
- Store your dried herbs in air tight containers. Zip closing bags will do. I like to use small canning jars.
- Be sure to label and date your containers.
- Your herbs will retain more flavor if you store the leaves whole and crush them when you are ready to use them.
- Discard any dried herbs that show the slightest sign of mold.
- Place containers in a cool, dry place away from sunlight.
- Dried herbs are best used within a year. As your herbs lose their color, they are also losing their flavor.
My herbs are hanging on a drying rack by our wood stove (the stove is not on yet) and tomorrow I will bundle the parsley and oregano and put them into their brown paper packages.
Tomatillo Mexican Salsa
This morning I got up early and once Matt was gone to work (his 7th straight day) I put in one of my favorite Neko Case cds and got busy in the kitchen. Working alone does have its advantages (loud music); although, Matt and I do make a great canning team. Will he ever return to can with me?
Todays mission…TOMATILLOS. I’ve never worked with these green little beauties but boy am I glad to get my chance. On their own they are super tasty; somewhere between a tomato and an apple? or is it an asian pear with seeds like a kiwi? I like them and between batches I snuck a few on my turkey sandwich.

RECIPE FOR TOMATILLO MEXICAN SALSA (from Complete Book of Small-Batch Preserving):
- 1/2 lb tomatillos (about 7 tomatillos)
- 1-2 jalapeno peppers or 1 hot banana pepper, seeded and finely chopped
- 2 cloves garlic, minced
- 1/2 cup chopped sweet red pepper
- 1/2 cup chopped onion
- 1/2 cup chopped carrot
- 1/4 cup each: apple juice and cider vinegar
- 3/4 tsp pickling salt
- 1/2 tsp each: ground cumin and dried oregano
- 1 tbsp granulated sugar
- Remove husks from tomatillos and discard. Wash tomatillos well. They are sticky and may need to be gently scrubbed with a soft brush. Coarsely chop the tomatillos into uniform size pieces about 1/2″x 1/2″. Wash and prepare other ingredients. Note: We always use a separate plate when cutting any kind of hot pepper and wearing gloves is also a good idea. This way you can be sure not to contaminate your cutting board and skin with that burning hot intensity these peppers pack.

- Place tomatillos, chiles, garlic, red pepper, onion, carrot, apple juice, vinegar, salt cumin and oregano in a medium stainless steel saucepan and bring to a boil over high heat. Cover, reduce heat and boil gently for 10 minutes.
- Stir in sugar, return to a boil and boil gently, uncovered, for 20-30 minutes or until mixture is thickened. Stir often to prevent the mixture from sticking to the bottom. Remove from heat.
- Ladle hot salsa into hot sterilized jars leaving 1/2″ headspace. Remove air bubbles and adjust headspace, if necessary by adding more salsa. Wipe rims with a damp paper towel. Place snaps and lids on each jar, screwing bands down until they are finger-tip tight. Place jars in hot water bath and bring to a full rollling boil and process for 20 minutes. When the time is up, turn off heat, remove canning lid and wait 5 minutes before removing jars to a folded towel on the counter.
- Check seals, label, and store. Refrigerate any unsealed jars.

This recipe comes from The Complete Book of Small-Batch Preserving by Ellie Topp and Maragret Howard. I love the recipes in this book as their ingredients often vary from some more familiar recipes. Part of the reason I chose this recipe was their use of carrots and apple juice. It seemed like an interesting choice and provides the finished jars with a great taste and a wonderful array of colours. However, I find the batches too small and I often double or triple the recipes. I did a triple batch of this salsa. And, I still did not get the expected yield (500mL per batch). I tend to thicken my batches down more than usual. I don’t like especially runny salsa. Personal preference.
Put up Total (a single batch will yield approximately 375mL):
- 1 x 500mL wide mouth mason jar
- 1 x 250mL wide mouth mason jar
- 2 x 250mL regular mouth mason jar
Note: the recorded Ph is 3.73
Green Tomato Jam
I woke up at about 3am this morning with dreams of jam making swirling around in my head. ‘Am I addicted or what!?! I was also worried about the green tomatoes I had soaking in a bowl…waiting for me. Were they in a stainless steel non reactive bowl? I was so worried about it I woke Matt up to ask him what he thought. He said his usual “they’ll be fine…go back to sleep” I closed my lids for a few more hours and woke at 7am to get last nights dishes tidied and my kitchen sorted for todays canning adventures.
My friend provided me with an abundance of green tomatoes and putting them up in an assortment of different ways is my challenge. After all no one needs 3 dozen jars of the same thing…or do they? Experimentation is the name of the game with this ingredient. So green tomato jam it is.

RECIPE FOR GREEN TOMATO JAM (courtesy of Fruits of the Earth):
- juice and finely pared zest of 1 small lemon (I cut the lemon peel into fine ribbons or strips)
- 1 pound green tomatoes, finely chopped
- 1 5/8 cups sugar (I did 1 2/3 cups)
- 2 pieces of stem ginger, about 1 inch in diameter, finely sliced
- Place the lemon zest in a stainless steel preserving pan and add just enough water to cover it. Bring to a boil on high heat. Reduce heat and simmer for about 1 hour or until soft and semi-translucent. Drain the zest, discarding the liquid.
- Place the tomatoes and lemon juice in a bowl with the sugar and leave overnight for the sugar to soak up some of the juices from the fruit. Use a glass or stainless steel bowl (a non-reactive bowl).

- Next day, pour the contents of the bowl into a non-reactive preserving pan and add the zest. Stir over a low heat until the sugar has dissolved, then turn up the heat and boil rapidly to reach setting point.
- Stir in the stem ginger.
- Ladle hot jam into hot sterilized jars leaving 1/4″ headspace. Remove air bubbles and adjust headspace, if necessary, by adding hot jam. Wipe rim. Center lid on jar. Screw band down until resistance is met, then increase to fingertip-tight.
- Place jars in canner, ensuring they are completely covered with water. Bring to a boil and process for 20 minutes. Remove canner lid. Wait 5 minutes, then remove jars, cool, label and store.

I did three batches of this at once…for some reason I prefer doing more rather than less even if it is a recipe I haven’t tried. The yield for a single batch is 500mL but I only got the yield of a double batch. I think when measuring the tomatoes I have too much of their water in the bowl accounting for less actual fruit. This jam is quite different from the red tomato jam posted earlier and I am wondering how the green tomatoes would fair as a substitute in that recipe…maybe something to think about?
Put up Total:
- 3 x 250mL wide mouth mason jars
- 1 x 250mL regular mouth mason jar
Canning, Canning and More Canning
Well, I don’t have anything new to show you…but I was canning today. Matt loved his oh so small taste of the tomato jam I made yesterday and was in complete agreement when I suggested I would repeat it again today. Another double batch made its’ way in and out of our kitchen. 
Plus, I prepared the green tomatoes for jam tomorrow. I am interested in how this recipe will turn out but I am confident that it will be amazing. It comes from Gloria Nicols’ book Fruits of the Earth and every one of her recipes is nothing short of amazing. If you get a chance you should check out her blog Laundry Etc There are lots of beautiful photos and more of her great recipes!

I am so fortunate to have great friends that are also extremely skillful gardeners. My good friend called me yesterday asking if she could drop by with a few tomatoes and such from her garden. When she arrived we unloaded 4 boxes of tomatillos, 2 boxes of green tomatoes, assorted peppers and a bunch of field cukes. Am I the luckiest girl on the planet!?! I have so many recipes that I want to try…any suggestions for the green tomatoes or tomatillos?
Tomato Jam
This jam is so delicious that I couldn’t wait to post this and I’m doing it while I make my SECOND batch. In the past, I’ve made tomato butter (yuck) and tomato jelly (okay) but this jam is amazing. I can see myself putting in on everything!!
I found this tomato jam recipe on Food in Jars while surfing canning blogs. It sounded good and different from my previous sweet tomato experiments. I abandoned my plans of making zucchini marmalade (for today) and got straight to work cutting up tomatoes. I love the fact that you don’t have to remove the seeds or the skin…that makes it much easier and Marisa is right…it adds to the texture and taste. I’m thinking of putting it on eggs, toast, sausages, hamburgers or just eating it straight from the jar. Now, I’m thinking I better make another batch or two!
RECIPE FOR TOMATO JAM (thank-you Food in Jars):
- 5 pounds tomatoes, finely chopped

- 3 1/2 cups sugar
- 8 tablespoons lime juice
- 2 teaspoons freshly grated ginger
- 1 teaspoon cinnamon
- 1/2 teaspoon ground cloves
- 1 tablespoon salt
- 1 tablespoon red chili flakes

- Combine all ingredients in a large stainless steel saucepan (non-reactive pot). Bring to a boil and then reduce temperature to a simmer. Stirring regularly, simmer the jam uncovered until it reduces by about half. This will take between 1 and 1 1/2 hours, depending on how high you keep your heat.

- When the jam has reached the gel stage remove from heat.
- Ladle hot jam into sterilized 250mL jars leaving 1/4″ headspace. Remove air bubbles and adjust headspace, if necessary, by adding hot jam. Wipe rim. Center lid on jar. Screw band down until resistance is met, then increase to fingertip-tight.
- Place jars in canner, ensuring they are completely covered with water, bring to a boil and process in hot water bath for 20 minutes. Remove canner lid. Wait 5 minutes, then remove jars, cool, label and store.


Put up Total:
- 2 x 500mL Fancy mason jars (1 vintage Kerr jar)
- 3 x 250mL wide mouth mason jars
- 5 x 250mL regular mouth mason jars


