Beer and Canning Collide
My love of beer and canning has turned into a frenzied obsession that could be a regular segment on this blog. And, after yesterday, I am not sure this is a good thing. We will call this Beer and Canning Part Two but it is really Part 4 act 7 as I have spent the last 4 days making 4 different kinds of beer jelly (reboiling 2 of them and making 2 batches of 3 different types). Crazy or what!?! The crazy part is, that although, the taste of each one of these 4 jellies is different and so delicious I have not been able to achieve that perfect jelly set. AGGRRRHHH…frustrating!! And, NO I’m not drinking the beer while making the jelly (maybe this is my problem?)
So, I’ve become obsessive about it…determined to master the art of making beer jelly. “Why?” you might ask. And, I would respond “because I’m a stubborn beer lover. Yes, a stubborn beer lover!”

I think a good jelly is determined by 2 things (1) the taste and (2) the set…you may argue that the third is how clear the jelly is but this is less important to me and for the most part these jellies are clear. The taste, I’ve mastered…because the recipe is simple in structure and the main ingredient is a flavourful beer. If you have that, then I think you will achieve a great tasting product. But, the SET is where I am struggling. Matt doesn’t like it too firm. He would prefer it to be a little bit on the running side rather than over done but for me that is just not good enough….I’ve achieved the running jelly and I don’t like it! I want the perfect tasting, perfectly set Spice Beer Jelly. Is that too much to ask?
So, before Matt has broken a sweat at work, I have another finished Mill St. Coffee Porter jelly resting on the counter. And, I am very hopeful that this breakfast “top of the morning to ya” jelly has set up perfectly.
Beer is already carbonated; and, therefore, full of bubbly goodness. So don’t be surprised when this initially foams up…just don’t stir it too much and it will subside. Here is what is looks like at the beginning with a few too many stirs.

And, like this without much stirring. It is important to remember that jellies, jams and marmalades will have larger bubbles at the beginning of the process because the liquid content is much greater.

As, you continue to cook the jelly the bubbles will reduce in size and become shinier.

When the bubbles become smaller and shinier it is a good idea to start testing for doneness. You can do by checking to see if the temperature has reached 220F.

Or, by removing it from the heat and dipping a frozen spoon into the jelly or putting a blob on your frozen plate and running your finger through it. If it stays separated than it is done. If it pools back together then return to the heat and continue cooking. I strongly recommend that with this jelly you use both methods and rely more heavily on the set tests or proof of set then on the temperature.
Skimming the foam and removing the bubbles is another part of the jelly process that is required in order to get a clear product. We usually use a large spoon to remove the foam that settles on the edges of the pot and the top of the jelly or jam.

And, when you have removed all the bubbles (I like using wooden skewers or a small spoon) you are ready to put the hot sterilized lids and bands on adjusting so that they are finger tip tight.

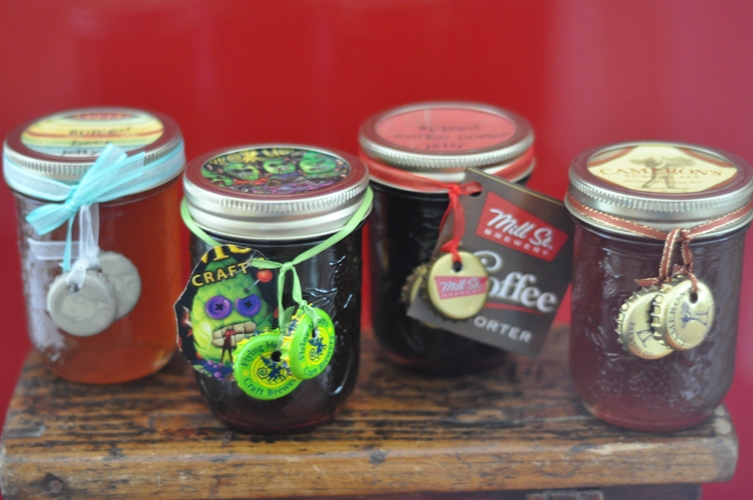
Here are a few of the finished (if you can call them that) jellies.

From top left to right…you have:
- Our first jelly made from Wellington’s Amber Ale – nicely set
- Flying Monkey Netherworld Cascadian – it’s a sauce…and it was reboiled to 221.5F and still did not set up
- Mill St. Coffee Porter – it’s a sauce…and, again was reboiled
- Flying Monkey’s Netherworld Cascadian – round two…boiled longer and to about 222.5F and is still not set up
- Cameron’s Amber Ale – so close I am willing to call it a jelly just out of frustration…could have used a few more minutes
- Mill St Coffee Porter – round two and still warm…I think we’ve got it. This one is already fairly set up and is still not totally cold down to room temperature. It was boiled to 224.5F and then some. Gel tested 5+ times and probably could have stayed on for a few more minutes.
This is what I did for the last batch…
- I made sure to follow the recipe exactly…not too much or too less of any one ingredient. Check
- You cannot rely solely on the temperature test…that is when jelly reaches 220F. In this case it reached 220F and even at 221.5F it still did not seem to set up properly.
- Place 5 spoons and a plate in the freezer so that you are ready to do multiple set tests. I used every one!
- Yesterday, I timed every batch and concluded that it needed to boil for 20-25 minutes rather than 10-15 minutes. And, then I started to test its’ doneness. In every case it still needed more time…but you don’t want to go past the point of it being finished because then in can become too stiff.
- This last batch reached a temperature of 224.5F and it seems to be setting up nicely.
I wish the packaging counted…as I’ve had lots of fun dressing them up. The creative entries from Well Preserves pimp that preserve contest pushed me a few steps beyond my normal labelling. And, beer is worth doing that for!

Okay, now that I’m done…I am going to have a cold draft beer…MMMmmm, if all things couldn’t be this simple.

Put up Total: failures included…we processed the following number of jars
- Flying Monkey’s Netherworld ~ 10 x 250mL regular mouth mason jars
- Mill St Coffee Porter ~ 8 x 250mL regular mouth mason jars
- Cameron’s Amber Ale ~ 4 x 250mL regular mouth mason jars


You’ve mesmerized me. I admire the ingredients, your tenacity, and your whimsical jars. That first jelly looks beautiful. I may have to try this using my favorite Amber from our local brew pub — and I would definitely put the frozen spoons to work on it. Thanks for this great beer series. I’m glad to find your blog!
this is sheer mad genius. Love what you guys are doing in this post – and in general. Fun to find two other ‘locals’ who love beer and canning. 🙂 Thanks for the link too 🙂
I tried this yesterday and ended up with 3 pints of spiced beer syrup. 😦
Luckily, it’s (1) DELICIOUS and will be an interesting maple syrup substitue and (2) pretty simple to make, since I had already canned apple pectin stock…maybe that was the problem. I will have to try it again sometime soon.
Sorry to hear it didn’t work out :-(. This is the only jelly that I’ve ever had such a challenging time with…but it is delicious. The set point is much higher than you’d expect (around 224F-226F). And, I think the high sugar content in some of the beers can make it overly syrupy. Our best results have been with Auburn/Amber Ales.
I tried it with a black lager. It passed the freezer test, but only just barely. Next time I’ll have more patience, but at least it makes a tasty syrup.
I made some last night using a local red ale (after I canned your Strawberry Shoutout Jam!), and it’s delicious, too! I can’t wait to put it on grilled cheese or a party plate. What else do you do with your beer jelly? I’m not positive it’d pair well with peanut butter.
Awesome! The beer jelly also makes an excellent glaze for poultry! Or consider it for a sauce.