Sauerkraut ~ My German Love Affair
I love making sauerkraut. I am not sure if it is the simplicity of it or the fact that it sits on the kitchen counter bubbling away when no one is paying attention or that after several weeks fermenting you can start dishing it out to your friends and let them enjoy the ever-changing flavours it provides. Everyone should trying making a big crock of sauerkraut at least once in their life!!!
After 48 days, our 3rd batch of sauerkraut is ready to be jarred and processed. Some people leave their batches to continue fermenting but after about 6 weeks the cabbage is really tasty and can be jarred. But, you can also leave it to continue doing its’ thing and enjoy its’ ever-changing properties, eating it all up before it ever goes into a jar for processing. This too, is just fine and additional time will add more delicious tanginess. I decided to jar and process this kraut because it was getting increasingly more difficult to submerge under that ohhhh so tasty brine. Jar it, bottle it, store it, refrigerate it, eat it…mmmmMMM…it’s all good when it comes to KRAUT.
Over the past 48 days, I’ve taken many pictures of two batches we have fermenting into beautifully tasty, tangy deliciousness. Every batch that we’ve made has been different. One created an excessive amount of liquid almost instantly, another created bloom or scum right away, and this batch sat without bloom until it was 4 weeks into the process. With only 4 batches under our belts don’t have all the answers. You may also experience varying results…so, we suggest tasting it along the way. The taste also changes with the amount of bloom and time, but we think you will be able to tell that it is fermenting into that familiar tangy goodness.

This is what it looks like when we start. We’ve used green Ontario cabbage and compacted the thinly sliced pieces into a crock. You can just make out the liquid that it starting to cover the cabbage. It is important to make sure that all of the cabbage is completely submerged in brine. If your cabbage does not create enough of its’ own liquid you can bring 4 1/2 tsp of picking salt and 4 cups of water to a boil over medium high heat, stirring to dissolve the salt. Then, let it cool to room temperature and add it to your crock. We have had to do this on occassion. We find that adding the cabbage and salt in 5 pound layers and compacting it well usually helps to create excessive liquid.

Here, you can see bubbles forming along the edge. Sometimes, if the kitchen is really quiet, you can hear this plop, blop, plop sound coming from within. I love that sound…I know that it is working and magically changing into the kraut I love!

You can just make out a thin coat of bloom on the edge and a bit up on the plate. Some days it creates a ton (just over night) and other days not as much. We leave our crock on the kitchen counter so that we are reminded to check it daily and remove any scum that has formed.

Scummy bubbles form along the edge. This is a sure sign that it is working well. Although, skimming the bloom off is a daily event, it also gives you a chance to taste it as it changes along the way.

Over night all of this bloom has been created. It looks like a thick film or sheet of scum and it kind of smells like dirty socks….ahhh, it is working.

After 48 days fermenting it looks like this and we decided it was time to jar it up. It is tangy but not overly and could be left longer if you desire a stronger more intense flavour. However, it was getting more difficult to cover the sauerkraut with brine so we decided to process it.

We have always used the hot pack method which requires that you heat the sauerkraut on medium-high heat until it is warmed throughout. Do not boil. Then fill your hot sterilized jars, leaving 1/2″ headspace and process 1 litre jars for 15 minutes. We’ve used this method for all three batches but we are going to try the raw pack method for the fourth. The raw pack method changes two things: (1) you do not have to heat the sauerkraut and (2) the processing time increases from 15 minutes to 25 minutes for 1 litre jars.
And, if you are looking for the recipe refer to this post…RECIPE FOR SAUERKRAUT
Butternut & Ginger Curd
With Christmas over, we can start to share a few more of the recipes and jars of goodies we made especially for our holiday gift boxes. Well, each of our Christmas gift boxes was especially made for the recipient, (and, therefore, all slightly different) most of them will be enjoying this next delight…Butternut & Ginger Curd.
Butternut & Ginger Curd is truly one of our favorites…and it is a recipe that we are asked for time and time again. It comes from Gloria Nicol’s book Fruits of the Earth. Gloria truly has mastered the art of making a beautifully, tasty, ohhhh so delicious curd; and, we highly recommend giving it a whirl.

RECIPE FOR BUTTERNUT & GINGER CURD:
- 1 small butternut squash, peeled, and roughly chopped
- zest and juice of 1 lemon
- zest and juice of 1 orange
- 4 tbsp plus 1 tsp butter, preferably unsalted, cut into cubes
- 1 cup fine granulated sugar
- 2 large eggs plus 2 yolks, beaten
- 4 pieces of stem ginger, approximately 1 inch in diameter, finely chopped
- 3 tbsp syrup from the stem ginger
- In a pan, place the cubed squash and 1/2 cup of water (add more water if necessary to prevent the squash from sticking to the bottom). Cover and cook until tender. Drain and discard excess liquid.
- Purée the squash (we are now using our immersion blender for everything…it does a great job and makes clean up a synch). Alternatively, use a food mill or food processor.
- Measure 1 1/4 cups of the squash purée and place in a bowl over simmering water (or use a double boiler), pour the beaten eggs through a sieve onto the purée and add all remaining ingredients.
 Using a wooden spoon stir the mixture until everything becomes well blended and the sugar has dissolved. In the double boiler, continue to cook the curd on medium heat for 20-30 minutes, stirring frequently. It will be set and ready when it coats the back of the spoon.
- Pour the curd into hot sterilized jars, leaving 1/2″ headspace and process in a hot water bath for 15 minutes.


Please note: We have always processed our curd in a hot water bath (as outlined above) and stored the jars in a cool area until opened. Once open, they must be placed in the refrigerator and eaten within a couple of weeks. While, guidelines exist that caution home preserves about canning squashes (part of the pumpkin family) we are simply sharing our methods and do not expect you to substitute our judgement and practices for your own. This curd can also be made and refrigerated.
But, we will also note this…that on every batch tested our calibrated pH Meter reads no more than a pH of 3.89 and sometimes less which is well within the legal safety parameters (being less than a pH of 4.6) for safe water bath canning.
Put up Total (we did a triple batch):
- 1 x 250mL regular mouth mason jar
- 5 x 250mL wide mouth mason jar
Merry Christmas!
Wishing you all a Very Merry Christmas…from our home to yours!

Apple Lavender Jelly
We are way behind on posting what we’ve been canning in the kitchen but we are pretty certain folks are busy with their own holiday prepartions…baking delicious cookies, canning some preserves for gifts, wrestling with the traffic and crowded shops, and for some of us struggling with the snow too! Only two more sleeps and Santa will be here…yeah!!
Yesterday, was spent hand delivering all of our gift boxes…which I will post pictures of after Christmas (don’t want to spoil it for those patient souls). And, now that is done, I can get caught up with a few things here.
There are so many fabulous canning blogs out there that you can get caught up in all the wonderful things that are being made. I really find it inspiring to see what others are canning, baking, and cooking. And, when a preserver says that they’ve tried something new and think it is worth doing…I take note.
A while back, I read this post by Kaela from Local Kitchen about Apple Jelly with Lemon and Lavender. It’s a recipe she modified from Mes Confitures by Christine Ferber but I think Kaela really added her own flavour and flair to this one and I was anxious to try it. Lavender buds…who would of thought!?!

APPLE LAVENDER JELLY by Local Kitchen:
- 4lbs apples to yield 4 cups apple juice (I used Ida Reds like Local Kitchen) but you can use Granny Smiths.
- 1 small lemon, preferably organic
- 3 tbsp lemon juice
- 9 cups filtered water, divided
- 1 tsp dried lavender buds (look for them at your local health food store)
- pinch of salt
- 2 1/2 cups raw sugar (organic cane sugar), divided
Day One
- Wash the apples, quarter, remove stems and blossom ends. Place peels, cores, seeds, and all in a stainless steel preserving pan. Add the 8 cups of water, cover and bring to a boil over medium-high heat. Boil, stirring occasionally until the apples are soft and broken down. About 30-40 minutes.

- Strain softened apples through a jelly bag (we love this one), or several layers of dampened cheesecloth, to collect the juice. Give the pulp about 8 hours to drain (it is best left over night). Do not squeeze the jelly bag in attempt to collect more juice as you will add unwanted pulp making the finished product less clear. Don’t let the pulp go to waste, reserve if for sauce, butter, or leather ~ a trick Kaela is excellent at reminding us to do!


Day Two:
- Prepare for water-bath canning. Sterilize jars in the oven at 250F for 30 minutes.
- Place 5 spoons and 1 plate in the freezer to do your set tests.
- Scrub the lemon well and slice into thin rounds. Remove all of the seeds and place the slices in a single layer in a large stainless steel preserving pan or non-reactive pot. Add 1 cup of water and poach lemon slices over medium heat until lemon rinds are transparent. (The amount of time this takes will vary depending on how thinly sliced your lemons are. It took us approximately 45 minutes.) Add additional water if necessary to prevent rinds from sticking to the bottom.

- To the pot, add 4 cups of apple juice, lemon juice, lavender, sugar, and salt.
 (Once the sugar has been added you can put the mixture into your copper jam pan to finish.) Bring to a boil over high heat, stirring just
  until the sugar is dissolved. Maintain a lively boil, skimming the foam occasionally, until the jelly reaches the set point. Start checking the set after about 20-25 minutes. To check the set point remove it from the heat and dip a frozen spoon into the jelly or put a blob on a frozen plate and running your finger through it. If it stays separated than it is done. If it pools back together then return to the heat and continue cooking.
 - Ladle hot jelly into hot sterilized jars, wipe rim, place lid and rings on and adjust to finger-tip tight. Process in the hot water bath for 10 minutes. When time is up, turn off heat, remove lid and wait 5 minutes before removing jars.
- Check seals, label, and store.


Put up Total:
- 7 x 250mL
A Canning Christmas ~ A few of our Favorite Things
Christmas is less than 10 days away and we’ve been so busy canning and putting up that we are more prepared to withstand the icy cold winter than we are to exchange gifts…Okay, that is not totally true because most of our family and friends will be receiving an individually packed gift box of preserves…shhhh don’t tell anyone!
That being said we thought we would suggest a few of our Favorite Things to give to your favorite preserving pals. Here goes (these are in no special order):
European Tomato Press ~ from Lee Valley ~ This tomato press/foodmill makes the job of removing unwanted skins and seeds a breeze. There is a tray at the side that spits out the seeds and skins while a second spout releases the pulp. Although, set up requires a little bit of finessing and operating the handle is crowded with the two bowl set-up, the speed and efficiency of this product make it a joy to use.

Spice Ball ~ from Williams and Sonoma ~ We love this new spice ball from Williams and Sonoma because (1) the lid locks in place so you don’t have to worry about the contents spilling out and (2) it is easier to wash than a muslin spice ball and is more eco-friendly (3) plus, it floats making for easy removal.

Mauviel Hammered Copper Jam Pan ~ from Amazon ~ Not much needs to be said about this beauty!!! Love it! Love it! Love it! Although, it doesn’t appear that Williams and Sonoma sell this jam pan anymore click on the Mauviel Hammered Copper Jam Pan (above) scroll down to watch the video. The craftmanship and care that is taken in constructing each pot/pan truly speaks to the level of quality you get in each piece.

Mes Confitures by Christine Ferber ~ from Chapters ~ This book is loaded with wonderful recipes for making any kind of jam, jelly, or marmalade that you can imagine. Christine’s directions for making some of the most beautiful and interesting creations are easy to follow and the ingredients are readily available; making this an excellent choice.

Wild Fermentation by Sandor Ellix Katz ~ We love this book. Sandor outlines the benefits of eating fermented foods while providing readers with an explanation of the process and a number of great recipes. (Behind the book you can see our two crocks of sauerkraut just hanging out and doing their thing…we are hoping to start a combo crock of rutabaga with some purple and green cabbage this weekend.)

Rock Maple Utensils ~ Imagine Wood ~ Beautifully handcrafted spoons that work well with all of your pans and especially your cooper pans.

Circle Punch ~ Michaels ~ With these two circle punches, there is no fussing around trying to cut out the perfect circle. The 2 1/2″ and 3″ circle punches make adding labels to your jars a snap. You can create your own labels using sticker paper, scrapbook paper, newsprint, old maps, old christmas cards, or anything else you want. Many companies make them and they range in price from about $20-$35.

Jelly & Syrup Strainer ~ Lee Valley ~ This has changed our views on making jelly…before it seemed like such as task now it is a breeze. This stand sets up on most size bowls allowing you to strain small or large amounts of juice. It comes with two bags and replacement bags are available. An excellent gift for the jelly maker in you life.

Pot Clip ~ Lee Valley Just a handy little gadget that you can probably pick up at any kitchen store.

Two Piece Funnel ~ Lee Valley ~ This funnel comes with a second piece that adjusts the width of your opening…another handy little gadget.

Letter Stamps ~ The Dollar Store ~ We know a lot of you do your labels on the computer but (for those computer challenge individuals or those without a printer) another option is hand stamping them with these cool and inexpensive letter stamps. They come in a wide variety of fonts and can be picked up for a looney (one dollar). It is a little extra work but the finished result is worth it.

Kitchen Aid Immersion Blender ~ Canadian Tire ~ This hand-held Immersion Blender comes in both black and white. It is a powerful handheld blender that takes the fuss out of mixing ingredients. Easy clean up.

Colander ~ IKEA ~ This colander is great because it has adjustable stainless steel rubber coated arms that extend to hang over your sink and when these arms are not in use they just slide back in. It is strong and can hold whatever you throw in it. An inexpensive tool to have in the kitchen. Well visiting IKEA, you should check out the stainless steel mixing bowls (they are relatively inexpensive and come in 4 or 5 different sizes…we use them for everything).

Now, it would seem that Santa has already been to our house and that there is nothing left we need…and we’d probably say that “you’re right”. But, we would love to hear about the things that make your kitchen a better place to cook and can in! What are some of your favorite kitchen gadgets, books, or anything else? This year Santa needs all the help he can get!

Beer and Canning Collide
My love of beer and canning has turned into a frenzied obsession that could be a regular segment on this blog. And, after yesterday, I am not sure this is a good thing. We will call this Beer and Canning Part Two but it is really Part 4 act 7 as I have spent the last 4 days making 4 different kinds of beer jelly (reboiling 2 of them and making 2 batches of 3 different types). Crazy or what!?! The crazy part is, that although, the taste of each one of these 4 jellies is different and so delicious I have not been able to achieve that perfect jelly set. AGGRRRHHH…frustrating!! And, NO I’m not drinking the beer while making the jelly (maybe this is my problem?)
So, I’ve become obsessive about it…determined to master the art of making beer jelly. “Why?” you might ask. And, I would respond “because I’m a stubborn beer lover. Yes, a stubborn beer lover!”

I think a good jelly is determined by 2 things (1) the taste and (2) the set…you may argue that the third is how clear the jelly is but this is less important to me and for the most part these jellies are clear. The taste, I’ve mastered…because the recipe is simple in structure and the main ingredient is a flavourful beer. If you have that, then I think you will achieve a great tasting product. But, the SET is where I am struggling. Matt doesn’t like it too firm. He would prefer it to be a little bit on the running side rather than over done but for me that is just not good enough….I’ve achieved the running jelly and I don’t like it! I want the perfect tasting, perfectly set Spice Beer Jelly. Is that too much to ask?
So, before Matt has broken a sweat at work, I have another finished Mill St. Coffee Porter jelly resting on the counter. And, I am very hopeful that this breakfast “top of the morning to ya” jelly has set up perfectly.
Beer is already carbonated; and, therefore, full of bubbly goodness. So don’t be surprised when this initially foams up…just don’t stir it too much and it will subside. Here is what is looks like at the beginning with a few too many stirs.

And, like this without much stirring. It is important to remember that jellies, jams and marmalades will have larger bubbles at the beginning of the process because the liquid content is much greater.

As, you continue to cook the jelly the bubbles will reduce in size and become shinier.

When the bubbles become smaller and shinier it is a good idea to start testing for doneness. You can do by checking to see if the temperature has reached 220F.

Or, by removing it from the heat and dipping a frozen spoon into the jelly or putting a blob on your frozen plate and running your finger through it. If it stays separated than it is done. If it pools back together then return to the heat and continue cooking. I strongly recommend that with this jelly you use both methods and rely more heavily on the set tests or proof of set then on the temperature.
Skimming the foam and removing the bubbles is another part of the jelly process that is required in order to get a clear product. We usually use a large spoon to remove the foam that settles on the edges of the pot and the top of the jelly or jam.

And, when you have removed all the bubbles (I like using wooden skewers or a small spoon) you are ready to put the hot sterilized lids and bands on adjusting so that they are finger tip tight.

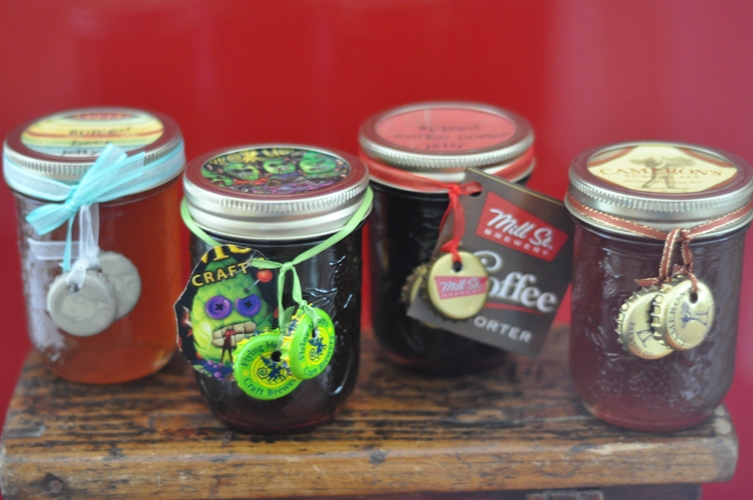
Here are a few of the finished (if you can call them that) jellies.

From top left to right…you have:
- Our first jelly made from Wellington’s Amber Ale – nicely set
- Flying Monkey Netherworld Cascadian – it’s a sauce…and it was reboiled to 221.5F and still did not set up
- Mill St. Coffee Porter – it’s a sauce…and, again was reboiled
- Flying Monkey’s Netherworld Cascadian – round two…boiled longer and to about 222.5F and is still not set up
- Cameron’s Amber Ale – so close I am willing to call it a jelly just out of frustration…could have used a few more minutes
- Mill St Coffee Porter – round two and still warm…I think we’ve got it. This one is already fairly set up and is still not totally cold down to room temperature. It was boiled to 224.5F and then some. Gel tested 5+ times and probably could have stayed on for a few more minutes.
This is what I did for the last batch…
- I made sure to follow the recipe exactly…not too much or too less of any one ingredient. Check
- You cannot rely solely on the temperature test…that is when jelly reaches 220F. In this case it reached 220F and even at 221.5F it still did not seem to set up properly.
- Place 5 spoons and a plate in the freezer so that you are ready to do multiple set tests. I used every one!
- Yesterday, I timed every batch and concluded that it needed to boil for 20-25 minutes rather than 10-15 minutes. And, then I started to test its’ doneness. In every case it still needed more time…but you don’t want to go past the point of it being finished because then in can become too stiff.
- This last batch reached a temperature of 224.5F and it seems to be setting up nicely.
I wish the packaging counted…as I’ve had lots of fun dressing them up. The creative entries from Well Preserves pimp that preserve contest pushed me a few steps beyond my normal labelling. And, beer is worth doing that for!

Okay, now that I’m done…I am going to have a cold draft beer…MMMmmm, if all things couldn’t be this simple.

Put up Total: failures included…we processed the following number of jars
- Flying Monkey’s Netherworld ~ 10 x 250mL regular mouth mason jars
- Mill St Coffee Porter ~ 8 x 250mL regular mouth mason jars
- Cameron’s Amber Ale ~ 4 x 250mL regular mouth mason jars


