Pin Cherry Jelly
Well, I admit it…I am tired of making jams and jellies. I have stemmed and cleaned and washed and scrubbed litres upon litres of wild berries this season and my hands are stained from the dark coloured juice. But, is it worth it? YES. It was all worth it and asked if I’d do it again…I’d say YES!
We are fortunate to have good friends who have wild pin cherry trees growing on their property. Beautiful trees ladled with fruit draping from every branch. It really is a wonderous sight…and the birds can only forge so much. So, we decided to help them out. After picking 18 litres of pin cherries which I then stemmed we were able to make several jars of jelly. We decided to go pectin free which we do most of the time with berries that are higher in natural pectin and it seems to work out just fine. A little longer to boil but not too much longer.
OUR RECIPE FOR PIN CHERRY JELLY:
- Makes 7 x 250mL
- Approximately 18 cups of pin cherries
- 5 cups pin cherry juice
- 8 cups sugar
- Wash cherries and place into a deep stainless steel saucepan with water and cook over low heat for 20-30 minutes or until all of the cherries have popped their skins
- Strain the juice and pulp through a jelly bag and leave over night
- Collect 5 cups of juice and place into a stainless steel sauce pan
- Add sugar, mix well and bring to a boil stirring constantly to preventing sticking. Boil hard for approximately 15 minutes or until setting point has been reached
- Pour hot jelly into sterilized jars leaving 1/4″ headspace
- Process in a hot water bath for 10 minutes
It is a dark jelly that will marry well with chicken. Use it as a glaze or create a sauce for something different.

Put up Total:
- 3 x 250mL fancy jars
- 5 x 250mL wide mouth jars
- 6 x 250mL regular mouth jars
- Plus, Spice Pin Cherry Jelly 4 x 500mL (1 fancy)
Summer Salsa
Summer canning would not be complete without making Salsa! There are many different salsa recipes and Bernardin does a great job of exposing us to a lot of them. Last year we tried several and it is our hope to one day conquer them all but for now we are going to repeat a classic…summer salsa with the ingredients we had on hand.
We made a double batch of this one. Now, the one thing I can say about this particular Bernardin recipe is the yeild is not accurate. Doing a double batch should have yielded 12 x 500mL but we only got 9 x 500mL. And, I found it to be a little bit on the runny side which I don’t like.

FOLLOWING THE BERNARDIN RECIPE:
- A single batch should yield 6 x500mL but we think it will be more like 9 x 250mL
- 4 cups chopped cored peeled tomatoes
- 2 cups chopped pitted peeled peaches, treat to prevent browning
- 2 cups chopped cored peeled pears, treat to prevent browning
- 1 red bell pepper, seeded and finely chopped
- 1 cup chopped red onion
- 3-4 jalapeno peppers, seeded and finely chopped
- 1/2 cup loosely packed finely chopped cilantro
- 1/2 cup liquid honey
- Grated zest and juice of 1 lemon
- 1/4 cup balsamic vinegar (we used cider vinegar)
- 1 tbsp finely chopped fresh mint
- In a large stainless steel saucepan, combine tomatoes, peaches, pears, red pepper, onion and jalapeno peppers. Bring to a boil over medium-high heat, stirring constantly to prevent sticking. Add cilantro, honey, lemon zest and juice, vinegar and mint. Reduce heat and boil gently, stirring frequently, until slightly thickened, about 5 minutes. (Note: we boiled ours for a lot longer because there was too much liquid and it was not thick enough)
- Ladle hot salsa into hot sterilized jars, leaving 1/2″ headspace. Remove air bubbles and adjust headspace. Wipe rim with a damp paper towel. Center lid on jar. Screw band down until resistance is met, then increase to fingertip tight.
- Place jars in canner, ensuring they are completely covered with water. Bring to a full rolling boil and process (250mL jars for 15 mins.) and 500mL jars for 20 minutes. When the time is up turn off the heat, remove canner lid and wait 5 minutes, then remove jars to a folded towel on the counter.
- Check the seals, label, and store. Refrigerate any unsealed jars.
Put up Total:
- 7 x 500mL wide mouth jars
- 2 x 500mL wide mouth fancy jars
Rum Plums

While doing the peaches in light syrup we did 2 x 3 litre baskets of plums…even easier to do than peaches? Yes, all you have to do with the plums is wash them, prick them with a fork in several places, pack in hot sterilized jars, laddle hot syrup into jars, seal and process for 10 minutes…oh, and don’t forget to add the rum ~ 1 tbsp per 1 litre jar.

Put up Total:
- 3 x 1L wide mouth mason jars
- Plus, 2 x 1L regular mouth mason jars (completed Sept. 3/10)
Tomato Sauce
Making tomato sauce is a must around here. I love pasta and there is nothing better than your own seasonally canned sauce to finish it off any italian dish. I also like my pasta topped with a little bit of cheese and our stewed tomatoes…but that’s another entry.
This year we are making a plain tomato sauce. Last year we did more than one sauce adding garlic and onions but this year the consensus was plain sauce is better and can be finished any way you’d like at the time of cooking.
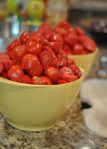
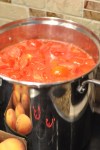
Although making tomato sauce takes time to cook down the preparation of it is much simpler than other tomato based recipes. For our basic tomato sauce you need only wash and half or quarter the tomatoes, cook in batches until soft and let your food mill remove the skins and seeds. And, the food mill prize of the year goes to this amazing tool ~ The European Tomato Press from Lee Valley…Item number EV101 and it’s $39.00. It was a gift from a friend and it makes doing tomato sauce a snap.
Here is a few shots from our tomato making…
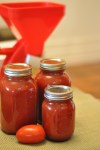
Put up Total:
- 31 x 500mL regular mason jars
- 7 x 1L regular mason jars
Fruit Ketchup
When you’ve bought more than you can put up in a reasonable amount of time what do you do? You adjust you plans and try something new. And, that is just what we did. With 3 flats of peaches sitting in our cold room we decided after jarring most of them in extra light syrup we would try something new. FRUIT KETCHUP ~ the recipe we used was from the Bernardin Big Book. It tastes a little more like barbecue sauce than ketchup but it will have a number of great applications…on meat, meat, and more meat!
Here is a pic of the finished product….

Put up Total:
- 2 x 250mL regular mason jars
- 1 x 300mL recycled jar
- 2 x 500mL fancy mason jars
Hot Cherry Bombs
This week at the grocery store we came across these interesting round globe-like peppers called “cherry bombs” and because they were different we walked away with a small bag. Just enough to pickle one 1.5 litre jar!
RECIPE FOR PICKLED HOT CHERRY BOMBS:
- Makes 1 x 1.5L jar
- 15 Cherry Bombs
- 8 Jalapeno Peppers
- Wash cherry bombs and prick with a fork in several places
- Wash jalapeno peppers and cut the tips off
- In a hot sterilized 1.5 litre jar put 2 cloves sliced garlic and 10 pepper corns; pack peppers to within a generous 1/2 inch of top of jar
- Bring brine to a boil. Brine consists of 4 cups white vinegar& 1.5 cups water
- Laddle hot brine into jar
- Note: you will have to wait until the peppers fill with the brine before processing. Continue to top up brine until peppers are full of liquid leaving 1/2 headspace
- Add sterilized lids and screw bands. Process for 10 minutes, remove lid and let jars stand for 5 minutes before removing
In a month you are going to have one hell of a hot fiery treat!

Put up Total:
- 1 x 1.5L regular mason jar


